24VAC Sprinkler Relay Board Buy Now
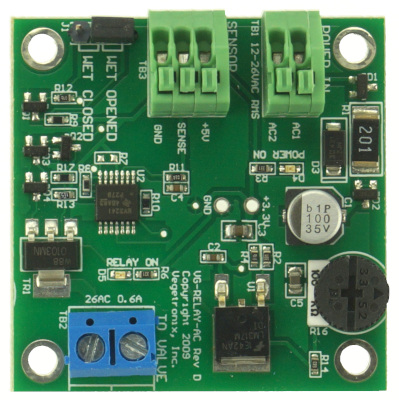
The VG-RELAY-AC board is perfect for controlling traditional sprinkler valves or other AC loads such as low power pumps. It interfaces directly to Vegetronix soil moisture sensors. It can be wired in series to valves and block watering events from a valve clock. In addition, since it is AC powered it can directly draw it's power from the clock. It has 2 LEDs to indicate that the board has power, and the on/off state of the relay.
It is not recommended for DC or high power loads.
The VG-RELAY-AC board interfaces to a single VH400 soil sensor, and can activate a low power AC load such as a valve or alarm, or other control device, when a moisture level is reached. The threshold is easily set with the onboard variable resistor, and a small screwdriver. The relay board can be configured with a jumper to turn the relay on when the sensor detects wetness or on when the sensor detects dryness.
The VG-RELAY-AC also serves as an evaluation board. If you are thinking about testing our VH400 soil moisture sensors you should consider purchasing this board as well.
Wiring up this relay board to a valve and irrigation clock is very simple, as seen in the connection diagram below. The board is wired to a common and a valve output of the irrigation clock, and in turn it directly drives a single valve.
Take care in not allowing the valve driver outputs to short together, in this will cause irreparable damage to the relay board.
If your irrigation system drives a water pump, you should consider our Sprinkler Pump Blocker. This device will automatically turn off your pump when no valves are energized.
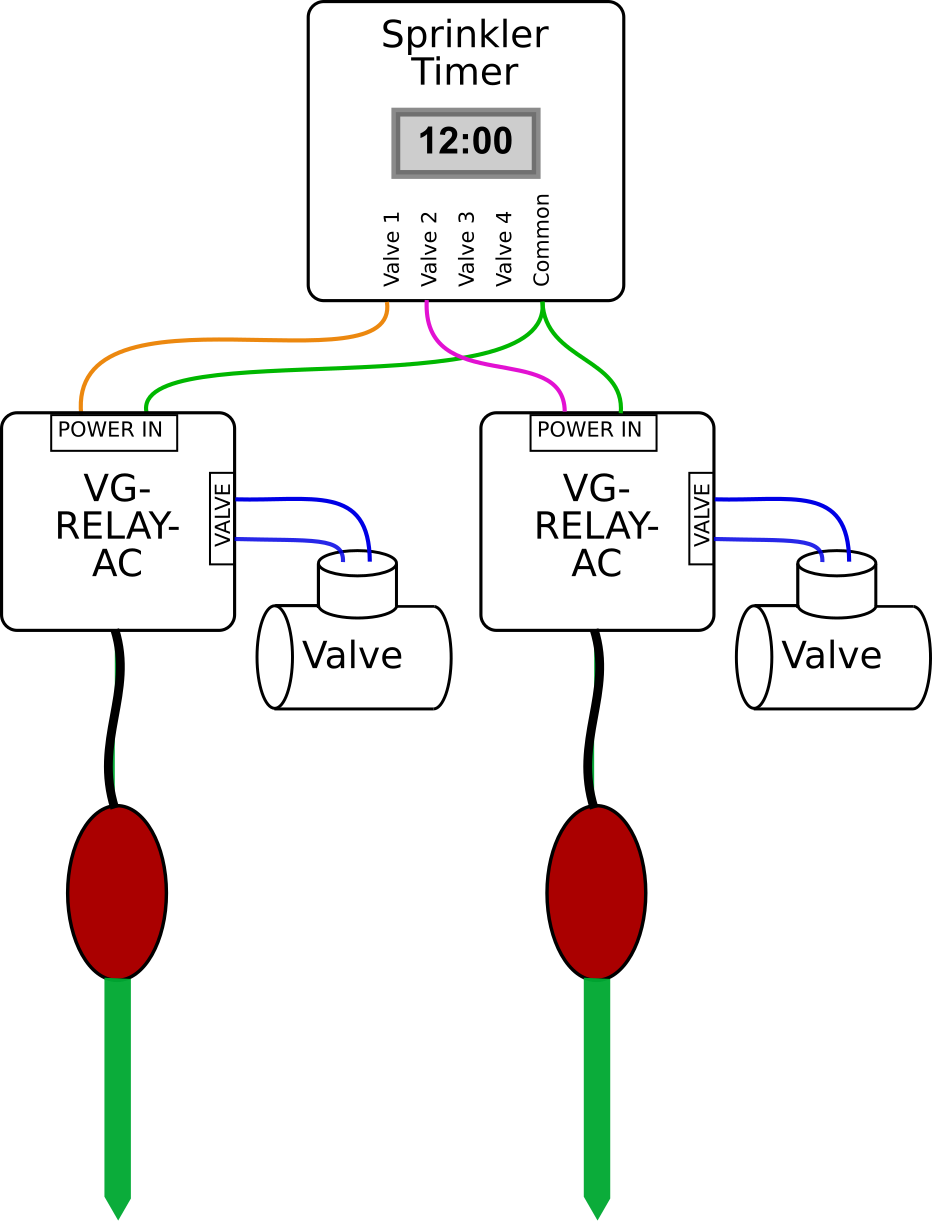
VG-RELAY-AC Connection diagram, showing interface to Valve and VH400 Soil Moisture Probe.
Applications
- Crop Steering.
- Perfect for evaluating our VH400 soil moisture probes.
- Interruption and control off irrigation and sprinkler systems.
- Interface soil moisture sensors to home automation systems.
- Control and monitoring of moisture content in bulk foods.
- Rain and weather control functions.
- Environmental control functions.
- Water conservation applications.
- Fluid level measurements and control.
Features
- Wide AC input voltage range.
- Can be configured as a normally open or normally closed contact with a simple jumper setting.
- Uses a low power solid state relay.
- Can control an AC 0.6A load up to 600VAC.
- Interfaces to a single VH400 probe.
- Low power.
- LED indicators, indicate power on and relay contact.
- Terminal blocks for quick connection.
- Low price.
- Small size.
- 4 mounting holes in each corner.
Relay Board Selector Guide
Vegetronix offers a variety of relay boards for nearly every application. See our Relay Board Selector Guide for help in determining which board is appropriate for your application
Other Vegetronix Products of Interest
- Sprinkler Pump Blocker
- Soil Moisture Sensor Relay Boards
- VH400 Soil Moisture Probes
- VegeHub Garden Sensor WiFi Hub
- SDI-12 Sensor Engine
- SDI-12 to RS232 Translator
- SDI-12 to USB Translator
- Soil Moisture Meter
- Universal Sensor Display
- Water Level Sensors
- Soil Temperature Sensors
- Voltage to Current Loop Translators
- SDI-12 Protocol Translators
- Data Loggers
Pricing and Ordering Info
We ship to nearly EVERY COUNTRY on the planet, directly to you from our factory.
99% of orders ship same day.
| BUY NOW FROM OUR WEBSITE STORE | |||
| Part Number | Description | Price | Purchase |
|---|---|---|---|
| VG-RELAY-AC | AC Relay board for the VH400 probes. Interfaces to a single VH400 Moisture Sensor Probe. | Buy Now | |
For volume pricing contact us.
Specifications
| VG-RELAY-AC | |
|---|---|
| Power consumption | < 40mA when relay engaged. |
| Supply Voltage | 6V to 26 VAC (rms). |
| Relay Load | 600VAC with maximum 0.6A load |
| Dimensions | 1.75in by 1.75in |
| Number of sensor interfaces | 1 |
| Number of relay outputs | 1 |
Wiring Table
| Terminal Block TB1 (INPUT POWER INTERFACE) | |
|---|---|
| Pin | Description |
| 1 | AC or DC input 1 (max 26VAC rms) |
| 2 | AC or DC input 2 (max 26VAC rms) |
| Terminal Block TB2 (RELAY INTERFACE) | |
|---|---|
| 1 | Relay contact 1 |
| 2 | Relay contact 2 |
| Terminal Block TB3 (SENSOR INTERFACE) | |
|---|---|
| 1 | GROUND: (connect to probe ground - bare wire) |
| 2 | SENSE: (connect to probe output - black wire) |
| 3 | POWER: 5V (connect to probe power - red wire) |
Instructions
You will need a sensor, and 24VAC irrigation timer, to get started.
Wire the sensor into the 3 pin terminal block. The bare wire connects to GND, the red connects to POWER, and the black wire connects to the SENSE.
Connect the common wire from your sprinkler valve to the AC input, and one of the valve lines to the other AC input line. The polarity doesn't matter.
Now connect the valve wires to the relay terminal block. The polarity doesn't matter.
There is a black jumper (shunt) on the board, which controls the polarity of the output in relation to the sensor's readings. Normally you want the valve to turn on when the moisture sensor reports that the soil is dry (sensor low voltage), and so this jumper is on the "Wet Opened" setting for most sprinkler systems. If you want to reverse how this works, such that the valve is open when the soil is wet (sensor high voltage), place the jumper on the other setting.
To adjust the the trigger point, you will turn on the valve with your sprinkler timer. This will energize the relay board. Turn the threshold adjustment knob to the middle range of it's rotation, and repeatedly grab and release the blade of the probe. You should see the LED on the board toggle, as well as your valve turn on and off. If it's toggling then you've hooked up everything correctly, and you can now bury the sensor, typically at root level.
During normal operation, if the ground is dry, the relay will pass the voltage from the clock to the valve, turning on the valve and your sprinklers. As the water seeps down, the sensor will detect the increase in moisture, and it's output voltage will increase, eventually triggering the relay board to turn off. If the ground is already wet, when the irrigation timer turns on a valve, the relay board will not pass the signal to the valve and you'll save water and money. Don't allow the sensor to be directly hit by the water from your sprinklers, because it will immediately turn off the valve, and you will have an incomplete watering session. To avoid this, completely bury the sensor at the root level of your grass/plants.
To figure out the best threshold setting for the sensor, set it in the middle, and then watch your grass/plants over the next few days, to make sure they are getting enough water. If they are getting enough, you can drop the threshold a bit, and then observe again. Ideally you want the relay to stop the watering at the point were the plants are getting just the right amount of water, and so this will take some experimentation over time to get it just right.
How to Get Started
The best way to get started is to purchase a few low cost probes and relay boards and try them out in your application.