VegeHub Relay - Quick Start Guide
Before You Start - Safety Advisories
WARNING: The VegeHub has an internal high voltage relay. To prevent accidental electrocution, before opening the enclosure or configuring it, turn off any high power source to which the hub is connected.
WARNING: The high power relay may switch on or off at any time, unexpectedly, and in turn unexpectedly turn on or off any devices that are connected to the hub's relay. Before touching any equipment that is controlled by the VegeHub make sure that any power running to the equipment is turned off.
WARNING: Don't use the hub in situations where it's failure could cause damage to property, or harm to people or animals.
Warning: Because batteries off-gas acid, especially in hot sealed environments, never place batteries inside the VegeHub enclosure, as this will corrode and destroy the electronics, over time, and void any warranties.
Video Quick Start Guide
The following video will guide you through the VegeHub configuration process, and show you how to connect it to the cloud server site - VegeCloud.com. The text below this video goes through the same information.
Connect your VegeHub to VegeCloud in only 5 Min.
Configure the VegeHub to connect to your local WiFi network
The first step is to configure the VegeHub for access to your local WiFi network.
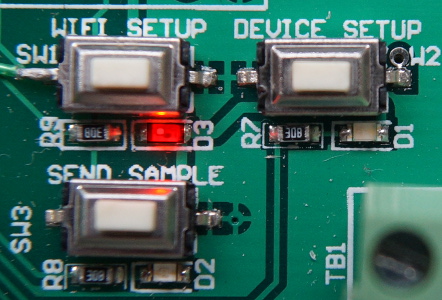
- Hold down the "WiFi Setup" button until its red LED turns on.
- The VegeHub has now created its own WiFi hotspot. Use a phone or laptop to connect to the new WiFi network. It will be named something similar to VEGE_HUB_E4_9B.
- Your phone or laptop may now ask you to log in to the network, this may bring you to the WiFi setup page for the VegeHub. If you are not asked to log in, open a web browser and type in to the address bar : 192.168.1.1.
- After the WiFi setup page appears, click the Refresh button to bring up a list of nearby
WiFi networks.
From the list, click your network. This will automatically fill in your network's name.
Now go to the "pass phrase" field and fill in your network's password, then click Connect. The response web page will be an error page, because the hub immediately disconnects from the network. Your phone or laptop should now automatically disconnect from the hub.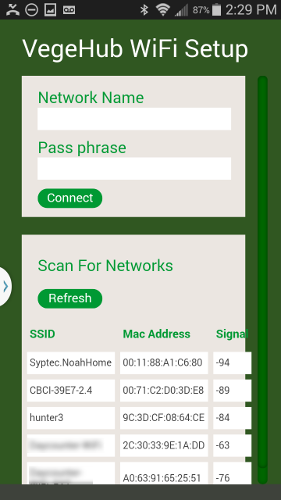
- The VegeHub will now try to connect to your WiFi network. If the red LED is still lit, press the WIFI setup button again, until it turns off.
Determine the IP address of your VegeHub.
Now that your VegeHub has connected to your network. You can configure it and direct it to connect to a remote server of your choice. To do this you will need to determine the IP address that your router has assigned to your hub.
You will need to insert a USB thumb drive into the Hub's micro USB slot. If your USB drive doesn't have the right connector, you will need to use a micro USB adapter.
The Hub will write a file called "ipaddress.txt" to the root folder of your thumb drive. Insert the drive into your computer, and open this file with a text editor, or just click on it. You will see something like the following:
Device IP address: 192.168.0.41
Now that you have your IP address. You can configure your hub in any web browser.
If you don't happen to have a USB thumb drive, you can use a phone application like Fing to scan your network and find the assigned IP address for your hub. This is more complicated so we recommend using the thumb drive method instead. Click here to see this method.
Configure the VegeHub
Now that you have the IP Address, you can access the configuration pages of your VegeHub. Press the Device Setup Button and the yellow LED should light up. This turns the hub into a mini web server which will serve up configuration pages. The yellow LED must remain on for the duration of the configuration. If it ever times out and turns off, just press the Device Setup Button again, and the yellow led will turn on, and you will be able to access the configuration pages again.
Bring up a web browser of a device that is connected to the same network as your VegeHub, and type in the IP address of your VegeHub (the one you got from the USB file). This will bring up the home page of setup webpage for the VegeHub.
VegeHub Home Tab
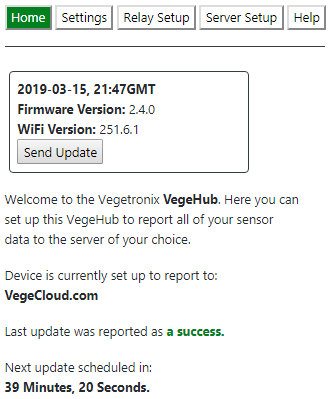
The "Home tab shows the current date and time, and firmware version and WIFI software versions, and lets you know to which server you are currently sending data.
The "Send Update" button allows you to immediately read a sensor and send the sample to the server that you will select in a subsequent step.
VegeHub Settings Tab
Click on the "Settings" tab to view and set the following settings:
- Unique Name - You can enter a unique name for the VegeHub. Other devices on the network such as your router will display this name to reference your VegeHub. Leaving it as the default value is recommended.
- Blink Led - When this box is checked, the green LED will blink once each time the hub connects to the server. Setting this option will reduce battery life slightly, but it is useful for troubleshooting.
- Send Hub Voltage - For applications when the VegeHub is powered by battery, this allows the battery voltage to be sampled and sent to the server along with the samples from the sensor. This allows you to remotely monitor the battery on the VegeHub, and be alerted when it needs to be changed.
- Sensor Power This allows you to apply constant power to the sensor. For battery applications this should only be used for very low current sensors, such as our Vegetronix mailbox sensor. This option is also useful when you are setting up sensors such as the AquaPlumb, which need power to be calibrated.
- Reporting Style - There are two reporting styles:
- Sample Mode This mode allows the VegeHub to periodically wake from sleep,
and read the sensor, and send these samples to your selected server after each
sample
is taken, or in batches to conserve battery life. Most analog sensors will use
this mode.
The following Sample Mode Options are available: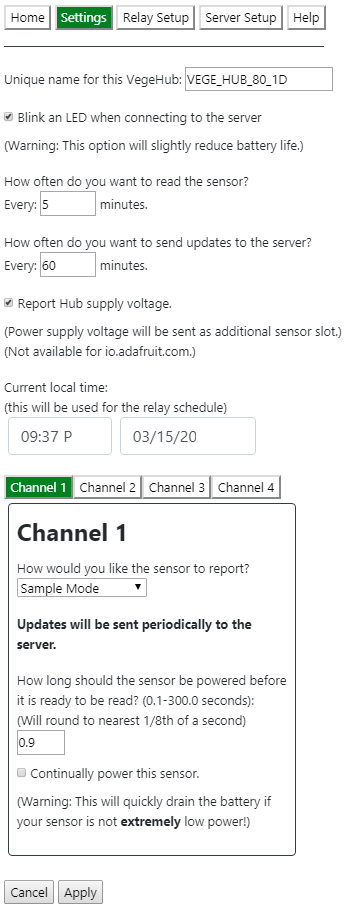
- Sample Period This specifies how often do you want to read the sensor. This setting will affect your battery life, and so you want to use the largest value possible to reduce battery consumption. Many sensors such as moisture sensors only need to be read about once per hour. If you want to read the sensor every hour, the enter 60 for this value. For initial setup and trouble shooting you may want to set this for rapid updates, then after it is working set it to a slower value, to conserve power.
- Update Period This specifies how often the VegeHub connects to your selected server to post data. If this value is the same as the sample period, then it will connect to the server each time it reads a sample of data from a sensor. If this is set to a value larger than the sample period, then it will batch post multiple samples when updating. It is best to set this to a multiple of the sample period value. This also affects battery life. The larger the period, the lower the battery usage. For initial setup and trouble shooting you may want to set this for rapid updates, then after it is working set it to a slower value, to conserve power.
- Warm-up Time This specifies the warm up time of the sensor before a reading is taken. Power is normally applied to the sensor only right before a sample is taken, to reduce battery power, however, most sensors need time to power up before they are fully functional. This field specified how long to wait after apply power, before taking a sensor reading. Check your sensor's specification to determine this value. Typical values are 1 second. If the check box for the sensor power is set to always on, then this field is ignored.
- Edge Trigger Mode This is a binary mode that allows the VegeHub to be
waken up from
sleep when a sensor has gone from 3V to 0V, or 0V to 3V, and for it to send
notification
to a server.
Use this mode for push button, mailbox sensors, or other binary type sensors,
that are either
on or off. Since the VegeHub only wakes up when a trigger occurs this greatly
increases
battery life.
The following Edge Trigger Mode Options are available: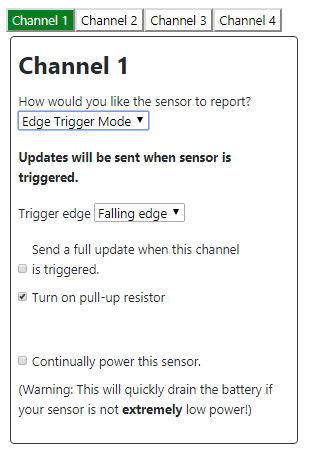
- Trigger Edge Falling means that the sensor's output goes from about 3V voltage to 0V, and raising means that the sensor's output goes from 0V to about 3V.
- Pull-up Resistor Checking this will enable an internal pull up resistor. This would typically be used with a push button. Don't use this option for the mailbox sensor.
- Sample Mode This mode allows the VegeHub to periodically wake from sleep,
and read the sensor, and send these samples to your selected server after each
sample
is taken, or in batches to conserve battery life. Most analog sensors will use
this mode.
VegeHub Server Setup Tab
The server setup tab allows you to connect with 3 popular IoT sites: ThingSpeak.com, io.Adafruit.com, and VegeCloud.com. VegeCloud is a new site, and is in Beta testing. You can also enter in any other server URL, but it must support VegeCloud formated data.
VegeHub Relay Setup Tab
The relay can be enabled or disabled with the check box. When enabled you can select between local sensor conditions or web sensor conditions. You can select whether the relay turns on, or turns off based on whether the selected conditions are met and true.
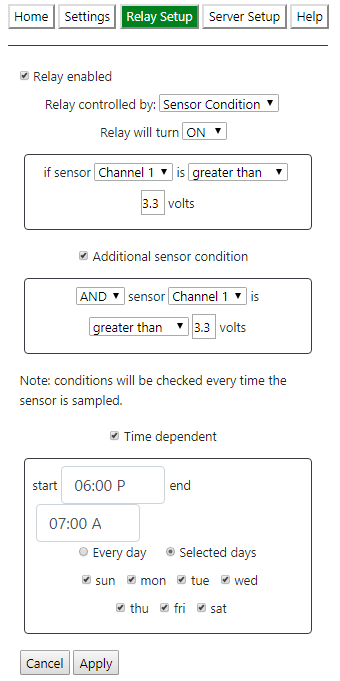
If you've selected local sensors conditions, you can can select up to 2 different sensor conditions from any of the 4 input channels. You can also add a time condition to block out times when you don't want the relay to turn on.
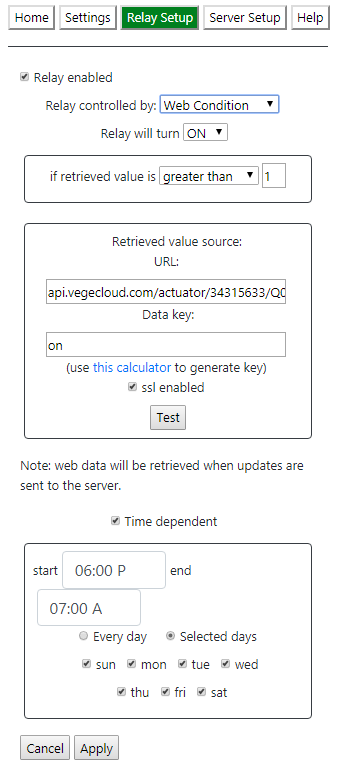
If you've selected web conditions, you can enter in a URL and a data key value. When this key value meets the conditional threshold the relay will turn on. You can also add a time condition to block out times when you don't want the relay to turn on.
To help you figure out the path of the data key value, we've created an on-line tool called PathGen, which will parse a JSON response from any URL, and tell you the path for each value of the JSON.
Troubleshooting Guide
See our VegeHub Trouble Shooting Guide for any difficulties setting up your hub.