Extension Cable Splice Kit Buy Now

Splicing sensor cables together can be a problem since cables must be completely water proof, otherwise water can corrode the exposed wires, and can also seep into the sensors over time. Until now, there have been few solutions that address both the inner wires, and also the outer jacket.
Each extension cable splice kit consists of 3 butt splice connectors that are crimped onto the inner wires, and a waterproof outer cylindrical shell with 2 cable glands. The outer shell protects the inner splice from water and corrosion.
You will need a tool to crimp the wires. This is not included.
In necessary, for additional water proofing, you can fill the body of the splice with your choice of urethane or epoxy or silicon gel, obtained from your local hardware store.
Each splice kit contains 3 BHT-0.5 splice butts suitable for 22 to 20AWG wires, 2 PG9 cable glands, and 1 3D printed cylinder enclosure.
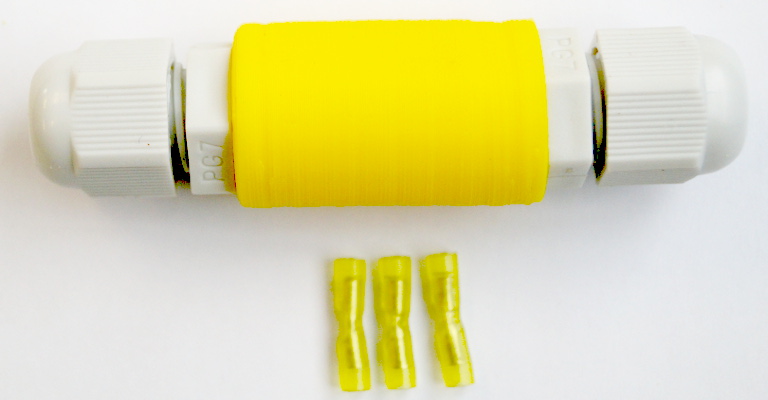
Extension Wire Splice Kit includes: 3 splice butts, 2 PG9 Cable Glands, and 1 cylinder enclosure
Other Vegetronix Products of Interest
VG-SPLICE Extension Cable Splice Kit and Ordering Info
We ship to nearly EVERY COUNTRY on the planet, directly to you from our factory.
99% of orders ship same day.
| BUY NOW FROM OUR WEBSITE STORE | |||
| Part Number | Description | Price | Purchase |
| VG-SPLICE-1 | Extension Cable Splice Kit - 1 pack | Buy Now | |
| VG-SPLICE-3 | Extension Cable Splice Kit - 3 pack | Buy Now | |
Contact us for volume pricing information.
Instructions
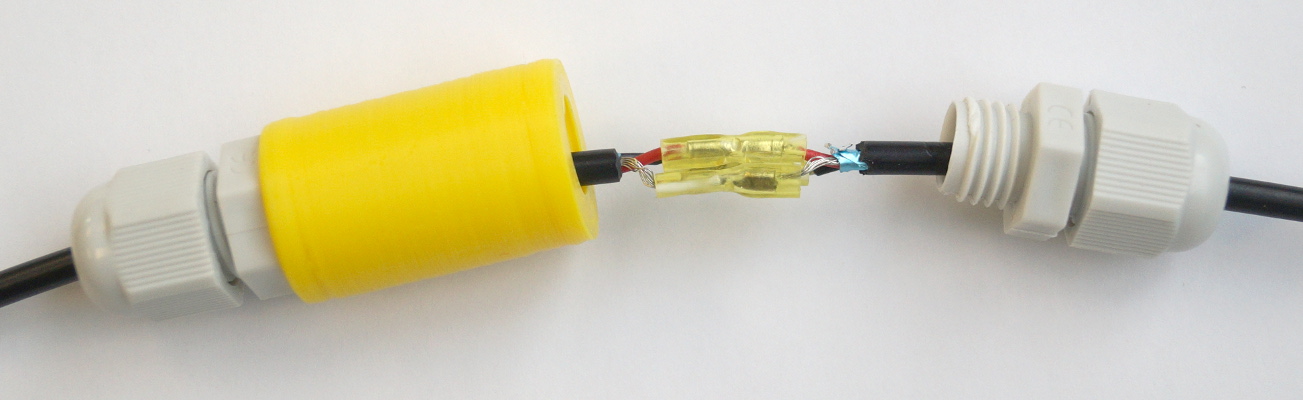
Before using the splice butts, make sure that you've opened up the outer enclosure, and placed one side of it, on each cable end.
- Using wire strippers, strip 1/2" (10cm) of the cable jacket from each side of the cable pair.
- Using wire strippers strip 3/16" (5cm) from each of the inner conductors.
- Unscrew and remove one of the cable glands from the cylinder and slide the cylinder onto one of the cables, and the cable gland onto the other, such that when the cable is spliced together the cylinder will and glands will recombine and screw back together as a single assembly. If you fail to do this step you may have to slide the outer cylinder over the length of the cable.
- Crimp the splice butts onto the inner wires, so that all 3 wires are connected. You will need a crimping tool.
- Optionally, you can use a heat gun to shrink the insulation on the splice butts.
- Slide the cylinder assembly over the spliced wire segment so that it is completely covered, and then tighten the cable glands so that the cylinder is water tight and can not slide.