VegeHub (Gen 2) Manual
Note - This is the manual for VegeHub models Rev D2 and beyond. If your VegeHub was purchased before 2024, please see the Gen 1 VegeHub Manual instead.
Important Notes
Warning: Because batteries off-gas acid, especially in hot sealed environments, never place batteries inside the VegeHub enclosure, as this will corrode and destroy the electronics over time, and void any warranties.
When first setting up a Hub, connect the Hub to a network before you add sensors to it.
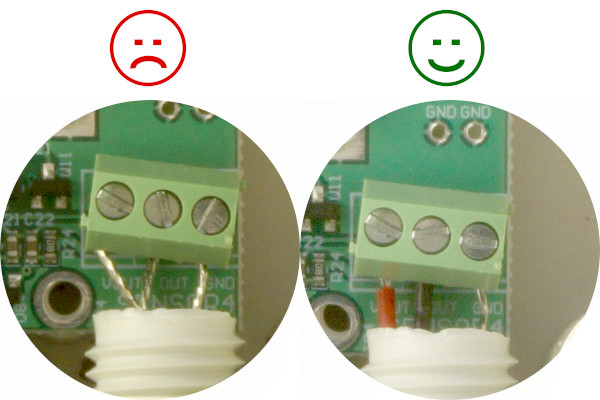
Ensure that all wires going to the terminal blocks are trimmed so that the exposed sections are fully covered with insulation, as shown in the diagram below. If bare wire is left exposed, it can short together, or to other parts of the circuit board, causing damage.
VegeHub Home Page
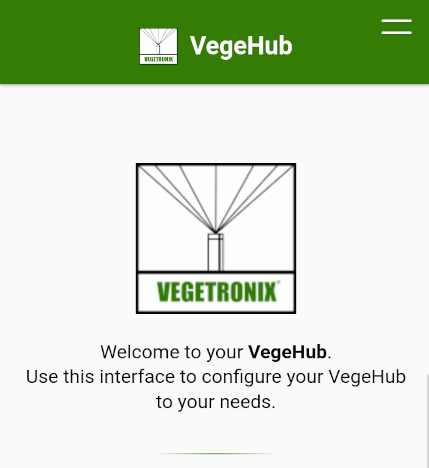
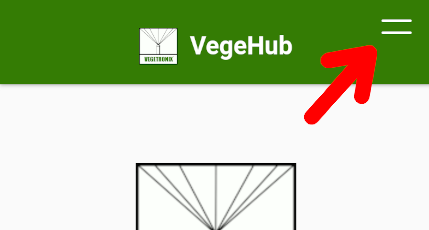
The home page of the VegeHub gives you some basic information about the Hub. For more specific information and configuration pages for the different systems on the Hub, please use the menu at the top of the page.
The "Send Update Now" button forces the Hub to override its schedule, and send an update to the server.
At the bottom of the Home page, you can see the current UTC date and time, as well as the firmware version and MAC address of your Hub.
VegeHub Settings Page
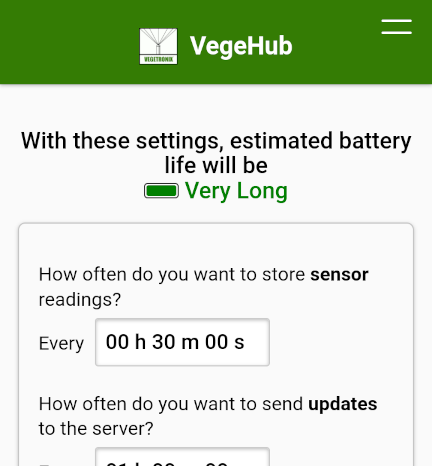
The Settings page of the VegeHub allows you to change general settings on the Hub. The settings shown on this page may be different depending on which version of the VegeHub you have.
- Battery life - When the Hub power mode is set to "Battery mode", a battery life estimator will appear at the top of the settings page. This is only a rough estimation. It takes into account the sample period, update period, remote sensor poll rate, onboard poll rate, and what percentage of time an actuator will be active.
- Sensor read period - This is how frequently the VegeHub will read and store values from the sensors attached to its sensor inputs. These values will be stored internally until the time has elapsed for an update to take place, and then they will be sent to whatever server has been configured.
- Update period - This setting determines how often updates are sent to the server. These updates will contain all sensor readings that are stored on the Hub at the time of the update.
- Remote sensor poll rate - This is how often remote actuator conditions will be checked. This setting has a significant impact on battery life, since the Hub has to fully power on and use its WiFi transmitter. This setting is only used during times where an actuator is active.
- Onboard sensor poll rate - This is how often the Hub will check the values of the onboard sensors that are being used for actuator conditions. This has a medium impact on battery life, since the Hub only has to power on briefly to check sensor values. This setting is only used during times where an actuator is active.
- Full LED feedback - When this setting is enabled, the Hub reports all the information it can through the LED. When disabled, the hub will try to use the LED as little as possible. This will have a very small impact on battery life.
- Expanded Debug logging - When this setting is enabled, the Hub will store significantly more information in its log. This is not usually desirable, as it will fill up the SD card with log information more quickly, but in situations where more information is needed to diagnose an issue, it can be very useful.
- Local UTC Offset - This is the amount of time difference between local time and UTC time (also known as the time zone). For example, United States Mountain Standard Time is -7 hours different from UTC. The hours and minutes should be adjusted until the local time displayed agrees with your local clocks. If this setting is not correct, time based scheduling will not execute at the correct time.
-
Power Source - This tells the Hub what kind of power source you are using.
- Battery mode - When set to battery, the Hub will use as little power as possible in order to maximize battery life. It will be in low power sleep mode for most of its operation, only waking up when it needs to perform actions, or when you press its button to wake it up. When the Hub is sleeping, you will be unable to access its web interface, unless you wake it up again by pressing its button.
- Power Adapter mode - When the Hub is in Power Adapter mode, it expects to be plugged in to a constant 5-12V DC power source. It makes no attempt to reduce power consumption. It never goes to sleep, and so its web interface is always active. This mode can be used for short periods while on battery power (for example, if you don't want the Hub to go to sleep while setting it up), but the Hub should be put back into battery mode as soon as possible to avoid draining batteries.
- Firmware Check - This will contact the Vegetronix servers in order to check whether new firmware is available. An internet connection is required for this function. Push the button to check, and the Hub will tell you the available firmware version on the server. If the versions are different, and you would like to change to the firmware version on the server, push the Proceed button.
Be sure to push the Apply button when finished, so that settings get saved to the Hub.
VegeHub Sensor Setup Page
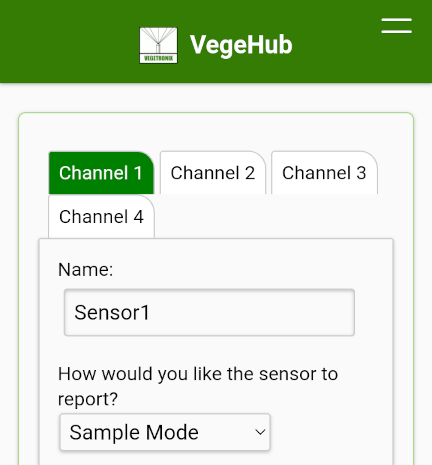
This page allows you to set up the sensor inputs on your VegeHub. If your VegeHub model does not have sensor inputs, this page will not be displayed.
- Sensor Name - This is just a label for this sensor, in order to make it easier to identify. For example, "Lawn Moisture".
-
Reporting Mode - There are two reporting modes:
-
Sample Mode This mode allows the VegeHub to periodically wake from sleep,
and read the sensor, and send these samples to your selected server after each
sample is taken, or in batches to conserve battery life. Most analog sensors
will
use
this mode.
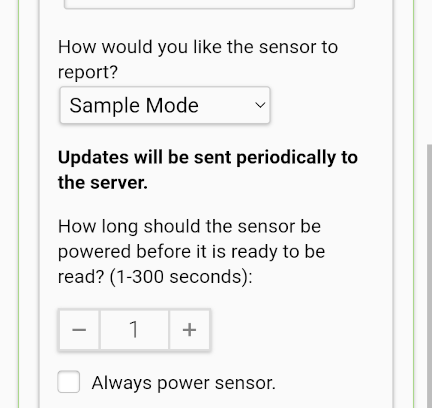
Warmup Time - This specifies the warm up time of the sensor before a reading is taken. Power is normally applied to the sensor only right before a sample is taken, to reduce battery power, however, most sensors need time to power up before they are fully functional. This field specifies how long to wait after the sensor is powered, before taking a sensor reading. Check your sensor's specification to determine this value. Typical values are 1 second. If the checkbox for the sensor power is set to always on, then this field is ignored.
-
Edge Trigger Mode This is a binary mode that allows the VegeHub to be
awoken
from sleep when a sensor goes from 3V to 0V, or 0V to 3V, after which it will
send a
notification to the server. Use this mode for push buttons, switches, or other
contact closure type sensors, that are either on or off. Since the VegeHub only
wakes up when a trigger occurs this mode can increase battery life.
The following Edge Trigger Mode Options are available: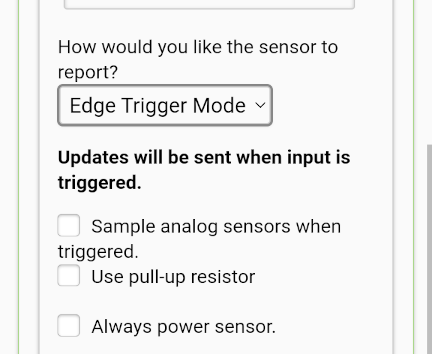
- Sample analog sensors when triggered - When this option is checked, if a trigger occurs, the Hub will sample all sensor channels before sending an update to the server. If unchecked, the hub just saves the value of the channel that caused the trigger, and sends that to the server.
- Pull-up Resistor - Checking this will enable an internal pull up resistor on the input of this sensor. This would typically be used with a push button, switch or contact closure sensor where it connects to ground when closed. Recommended to only use with normally-open switches.
-
Sample Mode This mode allows the VegeHub to periodically wake from sleep,
and read the sensor, and send these samples to your selected server after each
sample is taken, or in batches to conserve battery life. Most analog sensors
will
use
this mode.
- Always power sensor This allows you to apply constant power to the sensor. For battery applications this should only be used for very low current sensors, such as our Vegetronix VG-DARK sensor. This option is also useful for temporary use when you are setting up sensors, such as the AquaPlumb, which need power to be calibrated.
VegeHub Actuators Page
This page allows you to set up the actuators on your VegeHub. If there are no actuators on your model of VegeHub, this page will not be displayed.
The available settings are:
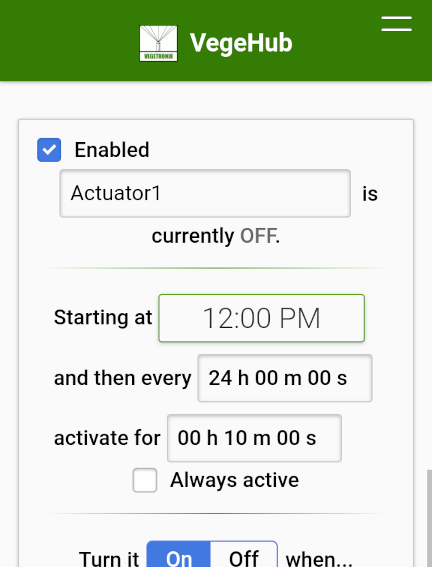
- Enabled - This checkbox determines whether this actuator is enabled. If unchecked, none of the conditions for this actuator will be evaluated, and it will remain off.
- Name - This is just a label for this actuator, in order to make it easier to identify.
- Start time - This is the time at which this actuator will start to be active. After this time, activations will reoccur periodically, based on the next setting.
- Activation period - This is how often this actuator will be activated after the start time. Every time this amount of time elapses, the actuator will be active for as long as is set in the Activation Duration.
- Activation Duration - This is the amount of time that the actuator will be active when the Activation Period has elapsed. As long as the actuator is active, it will be in the Target State, or, if you have added conditions, it will evaluate those conditions to determine whether it should be in the target state.
- Always Active - If this checkbox is checked, Start Time, Activation Period, and Activation Duration will be disregarded, and this actuator will always be active. That means that it will either be in the Target State, or, if you have added conditions, it will be evaluating those conditions to determine what state it should be in.
- Target State - This is the state you want this actuator to be in when it is active, or, if you have added conditions, this is the state you want the actuator to be in when conditions are true.
-
Conditions - If there are no conditions, the actuator will simply go into the
Target
State whenever it is active. Conditions can be added which will be checked, and the
actuator
will only be put into the target state if the conditions are met. Conditions can be
added by
pressing the "Add Condition" button. The maximum number of conditions is 4. The
available
conditions are:
- Onboard Sensor - This is a sensor that is connected directly to the hub you are using. This option will not be available if the model you are using does not have sensor input.
- Local Network Sensor - This option will scan the local network for other VegeHubs that have sensor inputs on them, and give you the option to use those as conditions. Once this option is selected, press the "Local Scan" button to scan for available Hubs. If you have another Hub on your network that is not showing up, make sure it is awake when the scan happens. It is also recommended that any Hub used as a Local Network Sensor be run in power adapter mode, since it will not be available when it is asleep.
- VegeCloud Sensor - This condition will use conditions that have been set up on VegeCloud for API key you are using. WHen this condition is selected, press the "Get Sensors" button to retrieve a list of any VegeCloud sensors associated with the API key in use. To set up these conditions, log in to your VegeCloud account and go to "Conditions" at the top of the page. From here, you can find and edit the conditions associated with the API key you are using for this Hub.
- Web API (JSON) - This condition allows you to use data from any URL that returns a JSON object. Once selected, you will reach a form where you can fill in the desired URL. The data to be pulled from the JSON is specified using a Data Key. This key can be calculated here, and will look something like this: "samples"[2]."value", where the keys within the JSON object are in double quotes(") separated by periods(.), with indexes into arrays specified by a number in square brackets ([0]) after the key to the array.
- Time - This condition allows you to choose a specific time range, as well as days of the week. The actuator will only be put into its Target State when it is Active AND it is within the time range of any Time condition it has.
- Operators - If you add more than one condition, you will see AND or OR between each one. These operators indicate how the conditions are chained together. If two conditions are connected through an AND operator, both must be true for the actuator to enter its Target State. If connected with an OR operator, if either condition is true, the actuator will be put into its Target State. If there is a mix of ANDs and ORs, the ANDs will be evaluated first, followed by the ORs.
- Activation estimation - At the bottom of the form, there is an estimate of the next time the actuator will be active. If settings have been changed, the form will need to be saved before the estimate will be accurate again.
VegeHub Actuator Control Page
This page allows you to manually control the actuators on your VegeHub. If your model of VegeHub does not have actuators, this page will not be displayed.
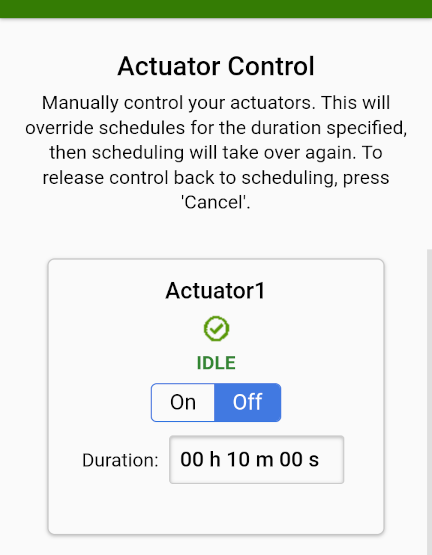
The Actuator Control page lets you override the current state of an actuator. Each available actuator will be listed along with its current state. Under each actuator you will see an ON/OFF switch that you can use to control it. Below that is the duration. The duration is the amount of time you want to override any other scheduled states for the actuator, and set it to the state you select. For example, if you have a ten minute duration, and click the OFF side of a switch, no matter what the schedule or conditions say, that actuator will be off for the next ten minutes.
Also note the Refresh and Cancel buttons.
- Refresh requests the latest actuator states from the Hub and updates them in this interface.
- Cancel releases all actuators from override control and allows them to return to their schedules.
VegeHub Server Setup Page
The server setup page allows you to connect with a few popular IoT sites: ThingSpeak.com, and VegeCloud.com. You can also enter in any other custom server URL, but it must support VegeCloud formatted data.
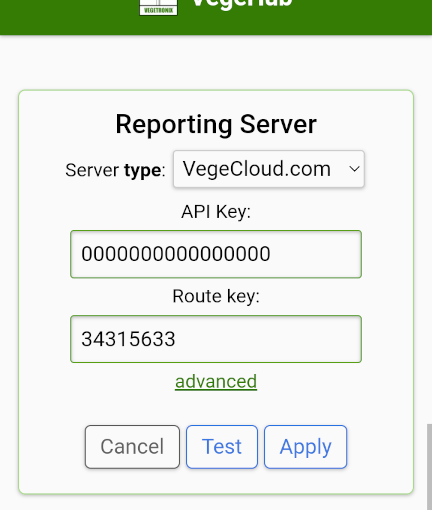
From the drop down list, you can select what type of server you would like the Hub to report to. The options are:
- None: No status updates will be sent to a server.
- VegeCloud.com: Sensor readings and actuator status will be sent to VegeCloud.com. You need to have an account set up on VegeCloud, and you should have created a new Hub in your hub list, so that you are provided with a "Write API Key". Fill that key into the "API Key" field on this page, as well as the Route key, which can be found at the top of your hub list on VegeCloud.
- Thingspeak.com: Sensor readings and actuator status will be sent to Thingspeak.com. You need to have a Thingspeak account already set up, and you will need to get an API key and Channel ID from there. Put those values into the appropriate fields on this page.
- Other: This option gives you the opportunity to send data to a custom server. You will need a URL, and an optional API key. If the server uses TLS, you will need to manually retrieve and upload its root certificate in the section below. Data will then be sent to this server as a VegeCloud formatted JSON object.
Pressing the Test button will send a request from the Hub to the server settings you have filled, and will report on whether the Hub was able to make contact.
Be sure to press Apply when you are finished
At the bottom of this page, you can upload root certificates for TLS servers that do not already have their certificates stored in the VegeHub. Memory space is limited, so by default the VegeHub only comes with root certificates for VegeCloud and Thingspeak servers. Additional root certificates can be added for use when connecting to custom servers.
Root certificates can be exported from most browsers and saved in .pem or .crt files. They should be PEM encoded for use on the VegeHub.
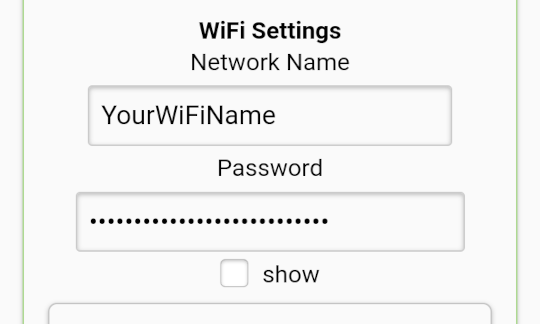
VegeHub WiFi Configuration Page
This page is where you can configure the WiFi name and password for you Hub, as well as changing its name and access point settings.
- Connection Status - Here you can see whether the VegeHub is connected to a WiFi network. If connected, you will also see it's IP address on that network, as well as its MAC address, and signal strength.
-
Unique Name - This is the name that your VegeHub will have on the local network. It should only have letters, numbers and underscores, and should not start with a number. If your network has mDNS working on it, you can use this name to access your hub through a web browser by typing the Hub's name, followed by .local.
This is also the name that will be broadcast for your Hub's access point.
- WiFi Settings - These are the Network Name and Password that the Hub should use to connect to your WiFi network. Rather than filling in your Network Name manually, you can use the Scan button below to list nearby networks, ,and then press the Use button next to the desired network.
- Static IP - Checking this check box presents you with fields to assign this Hub a static IP address. Do not assign a static IP address unless you are sure that the desired IP address is free on the network, and that DHCP will not try to assign that address in the future. An IP address conflict could make your VegeHub inaccessible.
- Access Point Settings - Here you can change the password for this Hub's access point. It is recommended that you change this to something other than the default in order to make it more secure. Do not forget the new password, as recovery would require a factory reset, wiping out all settings on the Hub.
Firmware Upgrade over WiFi
Vegetronix periodically updates the VegeHub firmware adding bug fixes and new features. The following short video shows how to update your firmware. Generally, you should not update the firmware, unless directed by Vegetronix technical support.
How to Update VegeHub Firmware
Firmware Upgrade using SD Micro Card
NOTE: Only do this type of upgrade if instructed by Vegetronix Tech Support.
NOTE: The Hub will check the version of the firmware that is on the SD card, and if it is the same as the version it is already using, it will skip the upgrade process.
Create a folder on the micro SD card called 'versions'.
Extract the zip file into the folder so the root of your SD card has a folder named 'versions' and inside that folder is a file called 'latest.json' and a folder called 'VG-HUB-VX_X_X' (Where the Xs are the version number).
Power off your Hub, and insert the SD card, then turn it back on. The system should automatically detect the firmware on the SD card and start loading it. It should take about a minute, and the LEDs will flash throughout. When it is finished, the LED should go to solid green for a few seconds, indicating a success.
The Hub will now restart with the new firmware.
Access the hubs settings page, and go to the home page. Verify that the firmware is the new version.
Factory Reset
It is possible to reset your VegeHub back to factory settings by holding the button on the board for 30 seconds. You will see blue and red flashing on the LED to indicate that a reset is coming, and then when the LED goes solid green, the reset is complete. The Hub will then restart, returning to factory settings and erasing all user settings.
How to do a Factory Reset of Your VegeHub
Trouble Shooting
See our VegeHub Trouble Shooting Guide for any difficulties setting up your hub.
See our VegeHub Diagnostic LED to decode the meaning of the various LED indicators.